Powershell

Automatically join a machine to your domain

This short script will join a machine to your domain. This can be useful as a post start up script that will launch after a machine has been imaged.

$domain = "DOMAIN"
$password = "PASSWORD HERE" | ConvertTo-SecureString -asPlainText -Force
$username = "$domain\USERNAME HERE" 
$credential = New-Object System.Management.Automation.PSCredential($username,$password)
Add-Computer -DomainName $domain -Credential $credential

Feel free to comment if you have any questions!

Operating System Audit

Recently I noticed that Kaseya (our system management system) does not always update the operating system name when a computer has been upgraded. It can take a while for a computer to report back in and provide accurate information. Since we finished up our Windows 10 upgrades, we wanted to be 100% sure that we upgraded all our machines. So to verify this information I wrote a script to find out every machine’s operating system in our network.

Read more

Universal Uninstall and Install Script

Recently, I decided to make a Powershell script that will make it easier for larger environments to uninstall and upgrade software. This is a continuation of the script that I wrote a while back ago that can find uninstall strings for 32 and 64bit applications (Link). Similar to the previous script, this script will automatically find the uninstall string for the specified program, but now it will also uninstall the program and install an upgraded version with the install file that you picked.

Read more

Launch a hidden Powershell script


This short VBscript will launch a hidden Powershell script without any windows:

command = "powershell.exe -nologo -ExecutionPolicy Unrestricted -File C:\script.ps1"

set shell = CreateObject("WScript.Shell")

shell.Run command,0

Automatically assign Office 365 licenses to new users

We recently setup the Azure Active Directory Sync Tool and noticed that it does not automatically assign licenses to new users. This can be a real pain for a big company so I decided to create a script that will automatically do this for us.
Read more

Connecting and writing to a SQL DB with Powershell

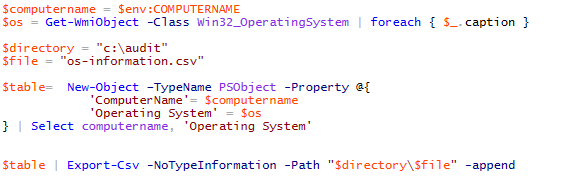
For this example, we are going update our User Logon Script that you can find here and have it insert data into a SQL database.

First we will need to get our information that we will be inserting into the SQL Database:

$username = $env:USERNAME
$computername = $env:COMPUTERNAME
$ipv4 = Test-Connection -ComputerName (hostname) -Count 1 | foreach { $_.ipv4address } 
$ipv6 = Test-Connection -ComputerName (hostname) -Count 1 | foreach { $_.ipv6address } 
$computermodel = get-wmiobject win32_computersystem | foreach { $_.model } 
$serial = get-wmiobject win32_bios | foreach { $_.serialnumber } 
$action = 'Logon'
$timeformat='MM-dd-yyyy hh:mm:ss tt'
$time = (Get-Date).ToString($timeformat)

Now we will need to start connecting to our SQL Database. In the example we will be using the following SQL information:
SQL Server = SQL-Server-01
Database Name = Comp_Info
Table Name = LogonInfo
Columns = Date and Time,Username,Comptuter Name,IPv4 Address,IPv6 Address,Model,Serial,Action

Now we have to start the SQL database connection:

$connection = New-Object System.Data.SqlClient.SqlConnection
$connection.ConnectionString = "Data Source=SQL-Server-01;Initial Catalog=Comp_Info;Integrated Security=SSPI;"
$connection.Open()

Now we will prepare to insert the data:

$cmd = New-Object System.Data.SqlClient.SqlCommand
$cmd.connection = $connection
$cmd.CommandText = "INSERT INTO LogonInfo ([Date and Time],Username,[Comptuter Name],[IPv4 Address],[IPv6 Address],Model,Serial,Action)
VALUES('{0}','{1}','{2}','{3}','{4}','{5}','{6}','{7}')" -f
$time,$username,$computername,$ipv4,$ipv6,$computermodel,$serial,$action
$cmd.ExecuteNonQuery()

And finally we will execute the query and close the database connection:

$cmd.ExecuteNonQuery()
$connection.Close()

The entire script should look similar to this:

#Gets computer information
$username = $env:USERNAME
$computername = $env:COMPUTERNAME
$ipv4 = Test-Connection -ComputerName (hostname) -Count 1 | foreach { $_.ipv4address } 
$ipv6 = Test-Connection -ComputerName (hostname) -Count 1 | foreach { $_.ipv6address } 
$computermodel = get-wmiobject win32_computersystem | foreach { $_.model } 
$serial = get-wmiobject win32_bios | foreach { $_.serialnumber } 
$action = 'Logon'
$timeformat='MM-dd-yyyy hh:mm:ss tt'
$time = (Get-Date).ToString($timeformat)

#Connects to Database
$connection = New-Object System.Data.SqlClient.SqlConnection
$connection.ConnectionString = "Data Source=SQL-Server-01;Initial Catalog=Comp_Info;Integrated Security=SSPI;"
$connection.Open()

#Inserts information to the DB
$cmd = New-Object System.Data.SqlClient.SqlCommand
$cmd.connection = $connection
$cmd.CommandText = "INSERT INTO LogonInfo ([Date and Time],Username,[Comptuter Name],[IPv4 Address],[IPv6 Address],Model,Serial,Action)
VALUES('{0}','{1}','{2}','{3}','{4}','{5}','{6}','{7}')" -f
$time,$username,$computername,$ipv4,$ipv6,$computermodel,$serial,$action
$cmd.ExecuteNonQuery()

#Closes Connection
$connection.Close()

User Tracking Logon Script

The following script will help you keep track of which machines are being logged into. The script will find the logged in user and it will retrieve basic information about the machine that was used to log in. The logons will be tracked in a CSV that is created daily by the script. To implement this, you can add the script to your GPO and have it run during logon.

The example saves the CSV in the C drive but you can save it anywhere by specifying the directory name in the $directory variable.

#Gets information for the spreadsheet
$username = $env:USERNAME
$computername = $env:COMPUTERNAME
$ipv4 = Test-Connection -ComputerName (hostname) -Count 1 | foreach { $_.ipv4address } 
$ipv6 = Test-Connection -ComputerName (hostname) -Count 1 | foreach { $_.ipv6address } 
$computermodel = get-wmiobject win32_computersystem | foreach { $_.model } 
$serial = get-wmiobject win32_bios | foreach { $_.serialnumber } 
$timeformat='MM-dd-yyyy hh:mm:ss tt'
$time = (Get-Date).ToString($timeformat)
$action = 'Logon'

#Specifies filename, and directory
$directory = "c:\"
$filedate = 'MM-dd-yyyy'
$filename = 'CompInfo' + ' ' + $(Get-Date).ToString($filedate)
$file = "$filename.csv"

#Creates custom table and sorts the information
$table=  New-Object –TypeName PSObject -Property @{
            'Date/Time' = $time
            'Username' = $username
            'ComputerName'= $computername
            'IPv4 Address' = $ipv4
            'IPv6 Address' = $ipv6
            'Model' = $computermodel
            'Serial' = $serial
            'Notes/Action' = $action
} | Select date/time, username, computername, 'IPv4 Address', 'IPv6 Address', model, serial, notes/action 

#Checks if CSV has already been created for the day.
if (Test-path "$directory\$file") {
    
    import-csv -Path "$directory\$file" > null
    $table | Export-Csv -NoTypeInformation -Append -Path "$directory\$file"

}

else{ 
    $table | Export-Csv -NoTypeInformation -Path "$directory\$file" 
} 

Find a user’s assigned groups in Office 365

You will need to follow the steps below to get this script to work.

Step 1: Install required software

These steps are required once on your computer, not every time you connect. However, you’ll likely need to install newer versions of the software periodically.
Install the 64-bit version of the Microsoft Online Services Sign-in Assistant: Microsoft Online Services Sign-in Assistant for IT Professionals RTW.
Install the 64-bit version of the Windows Azure Active Directory Module for Windows PowerShell: Windows Azure Active Directory Module for Windows PowerShell (64-bit version).

Step 2: Run the following script:

$credential = get-credential
Import-Module MSOnline
Connect-MsolService -Credential $credential
$ExchangeSession = New-PSSession -ConfigurationName Microsoft.Exchange -ConnectionUri "https://outlook.office365.com/powershell-liveid/" -Credential $credential -Authentication "Basic" -AllowRedirection
Import-PSSession $ExchangeSession

Now you can run the script to find a user’s assigned groups in Office 365.

$User = read-host -Prompt "User Name"
$user_dn = (get-mailbox $user).distinguishedname
"User " + $User + " is a member of the following groups:"
foreach ($group in get-distributiongroup -resultsize unlimited){
if ((get-distributiongroupmember $group.identity | select -expand distinguishedname) -contains $user_dn){$group.name}

}

Enjoy!

Backup User Profiles

Here is a Powershell script that uses Robocopy to copy a user profile or any directory to the specified destination.

$source = "C:\Users\username\"
$timefolder='yyyy-MM-dd'
$destname = (Get-Date).ToString($timefolder) 
$destination = "\\DESTINATION\$destname\"

$timeformat='yyyy-MM-dd hh:mm:ss tt'
$time = (Get-Date).ToString($timeformat) 

$dircheck = Test-Path $source

#Creating Log File
$time + "Creating Log" | Out-File log.txt

#Checks if source exists
if($dircheck -eq $true) {
    Write-Host "Backing up $source"
    $time + "Starting Backup" | Out-File log.txt
    ROBOCOPY $source $destination /COPYALL /SEC /MIR /S /E /W:3 /A-:SH| Out-file log.txt -Append
}
else {
    $time + "Source does not exist" | Out-File log.txt -Append
    Write-Host "Source does not exist!"
}

Scan for Files/Folders Older Than 90 days

This script will scan through a list of UNC’s and it will locate any folders or files that are older than 90 days. You can change the amount of days by editing the $gtdays variable.

$servers = Get-Content "\\SERVER\"
$gtdays = "90"
$timeformat='yyyy/MM/dd hh:mm:ss tt'
$time = (Get-Date).ToString($timeformat) 
$drive = "v"
$drivemapped = $drive + ":"

$username = 'USERNAME'
$password = ConvertTo-SecureString -string 'PASSWORD' -AsPlainText -Force
$cred = New-Object System.Management.Automation.PSCredential -argumentlist $username, $password

foreach($server in $servers) {
    
    #cmd /c net use v: $server  | Out-Null
    New-PSDrive -name $drive -psprovider filesystem -root $server -Credential $cred  | Out-Null
    $date = Get-ChildItem $drivemapped| Sort-Object -Descending -Property LastWriteTime | Select-Object -First 1
    $days = (New-TimeSpan $date.LastWriteTime $time).Days
    #cmd /c net use v: "/delete" | Out-Null
    Remove-PSDrive $drive | Out-Null

    if($days -gt $gtdays) {
        New-Object –TypeName PSObject -Property @{
            'Server' = $server
            'File or Folder Name' = $date.Name
            'Date'= $date.LastWriteTime
            'Days Old'= $days
        }
        
    }
    else {
              
    }   
}