Powershell

Test-RegValue Function

Powershell has a great CMDLET called Test-Path that can check to see if a registry key exists but unfortunately it does not have the ability to check for registry values. In order to get around this, I created the following function to check to see if a registry value exists. This can be extremely useful when you are using a registry key to verify if a script has already executed in the past.

Examples:
Test-RegValue -Key “HKCU:\Control Panel\Desktop” -Value WallPaper
Test-RegValue -Key “HKLM:\SOFTWARE\Custom” -Value Test

Function Test-RegValue {
    <#
    .SYNOPSIS
    Determine if a registry value exists

    .PARAMETER Key
    Provide registry key path

    .PARAMETER Value
    Provide registry value that you would like to test

    .EXAMPLE
    Test-RegValue -Key "HKCU:\Control Panel\Desktop" -Value WallPaper

    .EXAMPLE
    Test-RegValue -Key "HKLM:\SOFTWARE\Custom" -Value Test
    #>
    param (
     [parameter(Mandatory=$true)]
     [ValidateNotNullOrEmpty()]$Value,
     [parameter(Mandatory=$true)]
     [ValidateNotNullOrEmpty()]$Key
    )

    $ValueExist = (Get-ItemProperty $Key).$Value -ne $null
    Return $ValueExist
}

Read more

Remote Outlook 2016 Caching Report

I was recently asked to figure out a way to determine which users had cache mode enabled in Outlook 2016 and the end result is the script below.

In order to run the script, you will need to specify the following variables:
$Directory = Insert the exact path of where you would like to save your report ( EX: C:\Reports)
$File = Insert the file name of your report (EX: MyReport.csv)
$ComputerList = Insert the full path of your computer list (EX: C:\Computerlist.txt)


<#  

.SYNOPSIS  
    Run a report to find who is in Outlook Cache Mode

.NOTES  
    File Name  : OutlookCachingReport.ps1  
    Author     : Jose Espitia
    Requires   : PowerShell V5
    Version    : Version 1.00

#>

# Specify where to save the report
$Directory = "C:\Reports"
$File = "MyReport.csv"

# Computer list
$ComputerList = "C:\ComputerList"
$Computers = Get-Content "$ComputerList"

ForEach($Computer in $Computers) {
    
    Try { 
        # Test connection with computer
        Test-Connection -ComputerName $Computer -ErrorAction Stop
        # Query remote machines
        $HKEY_Users = [Microsoft.Win32.RegistryKey]::OpenRemoteBaseKey("Users",$Computer)
        # Get list of SIDs
        $SIDs = $HKEY_Users.GetSubKeyNames() | Where-Object { ($_ -like "S-1-5-21*") -and ($_ -notlike "*_Classes") }

        # Associate SID with Username
        $TotalSIDs = ForEach ($SID in $SIDS) {
            Try {
                $SID = [system.security.principal.securityidentIfier]$SID
                $user = $SID.Translate([System.Security.Principal.NTAccount])
                New-Object PSObject -Property @{
                    Name = $User.value
                    SID = $SID.value
                }                 
            } 
            Catch {
                Write-Warning ("Unable to translate {0}.`n{1}" -f $UserName,$_.Exception.Message)
            }
        }
        $UserList = $TotalSIDs 

        # Loop through users to determine If they are in cache mode
        ForEach($User in $UserList) {
            # Get SID
            $UserSID = $User.SID
    
            # Get list of Outlook profiles
            $OutlookProfiles = $HKEY_Users.OpenSubKey("$UserSID\SOFTWARE\Microsoft\Office\16.0\Outlook\Profiles\Outlook\")
    
            # Loop through Outlook profiles to find caching key
            ForEach($Profile in ($OutlookProfiles.GetSubKeyNames())) {
        
                $ProfileKey = $HKEY_Users.OpenSubKey("$UserSID\SOFTWARE\Microsoft\Office\16.0\Outlook\Profiles\Outlook\$Profile")
        
                # Locate cache key
                If(($ProfileKey.GetValueNames() -contains "00036601") -eq $True) {
                    $Result = $ProfileKey.GetValue("00036601")
                    # Convert value to HEX
                    $Result = [System.BitConverter]::ToString($Result)
            
                    # Determine if cache mode is enabled
                    If($Result -like "8*") {
                        $CacheMode = "Enabled"
                    }
                    Else {
                        $CacheMode = "Disabled"
                    }
                    # Create custom table
                    $Table = New-Object PSObject -Property @{
                        Username = $User.Name
                        SID = $User.SID
                        "Computer Name" = $Computer
                        "Cache Mode" = $CacheMode
                        "Registry Key Value" = $Result

                    } | Select-Object Username, SID, "Computer Name", "Cache mode", "Registry Key Value"
                    # Export table to CSV
                    $Table | Export-Csv -NoTypeInformation -Append -Path "$directory\$file"
                }
            
            }
        }
    }
    Catch {
        # Create custom table
        $Table = New-Object PSObject -Property @{
            Username = "N/A"
            SID = "N/A"
            "Computer Name" = $Computer
            "Cache Mode" = "N/A"
            "Registry Key Value" = "N/A"

        } | Select-Object Username, SID, "Computer Name", "Cache mode", "Registry Key Value"
        # Export table to CSV
        $Table | Export-Csv -NoTypeInformation -Append -Path "$directory\$file"
    }
}

Feel free to leave questions in the comments!

Enable or Disable Outlook caching based on the user’s location

The following script will use the user’s AD city and the default gateway to determine if a user is in their home office or visiting an office. If the script determines that the user is not in their home office, it will automatically disable Outlook caching and vice versa for a user that is in their home office.

In order for the script to work, you will need to use the cities listed in AD for your $CurrentLocation switch. Similar to the example below, you will also have to copy your default gateways inside of the switch.

<#  

.SYNOPSIS  
    Caches a user's mailbox based on machine type or location  

.NOTES  
    File Name  : OutlookCaching.ps1  
    Author     : Jose Espitia
    Requires   : PowerShell V5
    Version    : Version 1.00

#>
if($env:COMPUTERNAME -like "*-D") {    
    # Get Default Gateway
    $CurrentDefaultGateway = (Get-WmiObject Win32_NetworkAdapterConfiguration) | foreach { $_.DefaultIPGateway }

    # Find Machine's Location
    $CurrentLocation = switch ($CurrentDefaultGateway) { 
            10.101.1.1 {"Orlando"} 
            10.102.1.1 {"Miami"} 
            10.103.1.1 {"Atlanta"} 
            10.104.1.1 {"New York City"}
            10.105.1.1 {"Denver"}
            10.106.1.1 {"Austin"}
            10.107.1.1 {"Los Angeles"}
            10.108.1.1 {"Las Vegas"}
            10.109.1.1 {"Seattle"} 
    }

    # Get User's Info
    $objSearcher = New-Object System.DirectoryServices.DirectorySearcher
    $objSearcher.SearchRoot = New-Object System.DirectoryServices.DirectoryEntry
    $objSearcher.Filter = "(&(objectCategory=User)(SAMAccountName=$env:USERNAME))"
    $objSearcher.SearchScope = "Subtree"
    $obj = $objSearcher.FindOne()
    $UsersHome = $obj.Properties["l"]

    # Determine if user is in their home office
    if($UsersHome -match $CurrentLocation) {
        cmd /c REG ADD "HKEY_CURRENT_USER\Software\Policies\Microsoft\Office\16.0\Outlook\Cached Mode" /v Enable /t REG_DWORD /d 1 /f
    }
    else {
        cmd /c REG ADD "HKEY_CURRENT_USER\Software\Policies\Microsoft\Office\16.0\Outlook\Cached Mode" /v Enable /t REG_DWORD /d 0 /f

    }
}

Pin shortcuts to a user in a specific Active Directory group.

The following Powershell script will pin the Chrome shortcut to the Windows 10 start menu for anyone inside of a specific Active Directory group. In order to pin to the start menu, you will need to verify if your shortcut can be pinned through the GUI. To check this, you can right click your shortcut and see if you have “Pin to Start” available in your context menu. If you do not see this, then you may want to try copying the shortcut to:
%PROGRAMDATA%\Microsoft\Windows\Start Menu\Programs

In order to configure the script, you will need to provide values for the following variables:
$Group = YOUR AD GROUP
$Shortcut = “THE SHORTCUT NAME WITH THE EXTENSION”
$Location = “THE SHORTCUT’S LOCATION”

# Variables that need to be set
$Group = "YOUR AD GROUP HERE"
$Shortcut = "Google Chrome.lnk"
$Location = "C:\ProgramData\Microsoft\Windows\Start Menu\Programs"


# Get User's Info
$objSearcher = New-Object System.DirectoryServices.DirectorySearcher
$objSearcher.SearchRoot = New-Object System.DirectoryServices.DirectoryEntry
$objSearcher.Filter = "(&(objectCategory=User)(SAMAccountName=$env:USERNAME))"
$objSearcher.SearchScope = "Subtree"
$obj = $objSearcher.FindOne()
$User = $obj.Properties["distinguishedname"]

# Get Group Info
$objSearcher.Filter = "(&(objectCategory=group)(SamAccountname=$Group))"
$objSearcher.SearchScope = "Subtree"
$obj = $objSearcher.FindOne()
[String[]]$Members = $obj.Properties["member"]

If ($Members -contains $User) { 
    $object= New-Object -ComObject shell.application
    $folder = $object.Namespace("$Location")
    $file= $folder.parsename("$Shortcut")
    $file.InvokeVerb('pintostartscreen')  
}

Automate your BIOS update in MDT

This universal script will automate your BIOS updates in MDT. In order for this script to work, you will need to configure your MDT deployment share with the following folder structure:
DeploymentShare$\Scripts\Custom\BIOS

Inside of the BIOS folder, you will need a folder for each model that you are supporting in your deployment. The folder names must match the model name that MDT queries with ZTIGather.
You can run wmic computersystem get model to get this value.

Folder Structure Example:
DeploymentShare$\Scripts\Custom\BIOS\10HY002AUS
DeploymentShare$\Scripts\Custom\BIOS\HP EliteBook 8560w

Inside of these folders, you will need to place all the files needed to install your BIOS update. You will also need to create custom files needed to silently install and determine the latest BIOS version.

1st File: BIOS.txt
In this txt file, you will place the BIOS version of the update. This is used to compare the BIOS version installed on the machine and the latest update version.
Example: FBKTCCAUS

2nd File: UpgradeBIOS.cmd
In this file you will add all the commands needed to silently install your BIOS update.
Example:

REM Setting Current Directory
cd "%~dp0"
WINUPTP.exe -s

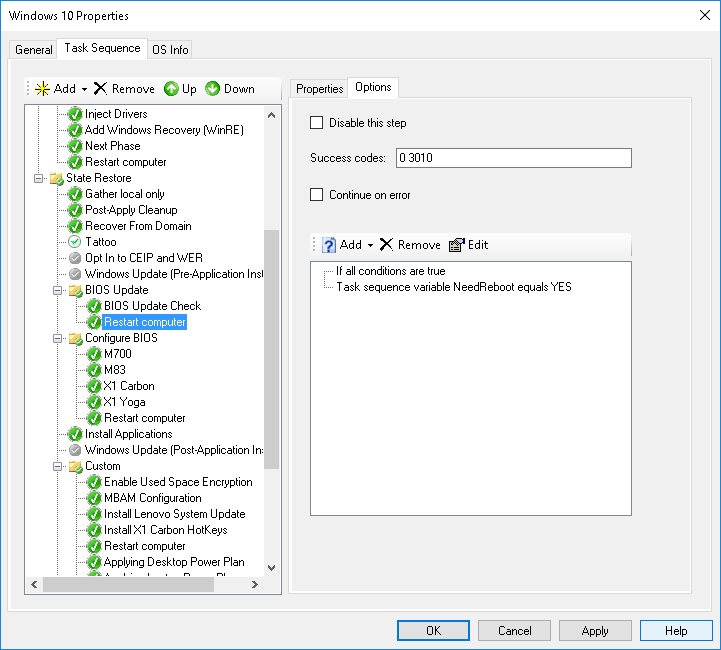
Once you have the the folder structure completed, you will want to add a Reboot task to your Task Sequence. With this task, you will need to add an if statement with the following configuration:

Reboot Task Configuration

And now for the actual Powershell script!

# Load MDT Task Sequence Environment and Logs
$TSenv = New-Object -COMObject Microsoft.SMS.TSEnvironment
$logPath = $tsenv.Value("LogPath")
$logFile = "$logPath\BIOS_Update.log"
 
# Start the logging 
 
Write-Output "Logging to $logFile." > $logFile
 
# Collect data
Write-Output "Collecting Data" >> $logFile
$ScriptRoot = (Get-location).Path
$Model = $TSenv.Value("Model")
$CompBiosVersion = (Get-WmiObject WIN32_BIOS).SMBIOSBIOSVersion
$CurrentBiosVersion = Get-Content "$ScriptRoot\$Model\BIOS.txt"
$Installer = "UpgradeBIOS.cmd"

try {
    Test-Path $CurrentBiosVersion -ErrorAction Stop
}
catch {
    Write-Output "BIOS.txt does not exist!" >> $logFile
}

Write-Output "Copying $ScriptRoot\$Model to C:\Temp\$Model" >> $logFile
Copy-Item "$ScriptRoot\$Model" "C:\Temp\$Model" -Force -Recurse
 
# Checking for BIOS update
if($CompBiosVersion.replace(' ' , '') -eq $CurrentBiosVersion.replace(' ' , '')) {
    Write-Output "BIOS is up to date." >> $logFile
    Exit
}
else {
    Write-Output "Updating BIOS $CompBiosVersion to $CurrentBiosVersion." >> $logFile
    Start-Process "cmd.exe" "/c C:\Temp\$Model\$Installer" -Wait
    $tsenv.Value("NeedReboot") = "YES"
    Write-Output "Update has been completed successfully." >> $logFile
    Exit
}

Query Available Windows Updates

The following script will allow you to query your available Windows Updates in Powershell and it will export it to a CSV file.

#Specify the location of where you want the CSV to be saved (Ex:\\Fileshare)
$location = "\\SHARE"

$MSsearch = New-Object -ComObject Microsoft.Update.Searcher
$Pending = $MSsearch.Search("IsInstalled=0") 
$Update = $Pending.Updates

$Title = $Update | Select-Object Title | foreach { $_.Title } 

$timeformat= "MM-dd"
$date = (Get-Date).ToString($timeformat)

if($Update.Count -eq 0) {
    Write-Host "There are no updates available for $env:Computername"
}

else {
  
    foreach($titles in $title){
        $kb = $titles.split('(')[-1].replace(')','')
        if($kb -like "kb*") {
            $table = New-Object –TypeName PSObject -Property @{ 
                'Title' = $Titles 
                'URL' = "https://support.microsoft.com/en-us/kb/$kb" 
            }
        }
        else {
            $table = New-Object –TypeName PSObject -Property @{ 
                    'Title' = $Titles 
                    'URL' = "Not Available" 
            }
        }
        $table | Select-Object Title, URL | Export-CSV -NoTypeInformation -Append "$location\Report.xml"
    }
    
}

How to reinstall all of the default Windows 10 apps

This short loop will reinstall all the default Windows 10 apps.

$pkgname = Get-AppxPackage -AllUsers | foreach { $_.packagefullname }
foreach($name in $pkgname) {
    Add-AppxPackage -register "C:\Program Files\WindowsApps\$name\AppxManifest.xml" -DisableDevelopmentMode
}

Get-TrackingInfo

It’s been a while since I have posted something, so here is a quick little function that can help you track your USPS packages right from your Powershell Console!

Example: Get-TrackingInfo -Trackingnumber YOUR-TRACKING-NUMBER-HERE

<#
 .Synopsis
    Track your USPS Packages
 .DESCRIPTION
    Track your USPS Packages right from the Powershell Console
 .EXAMPLE
    Get-TrackingInfo -Trackingnumber 555555555555
 #>
function Get-TrackingInfo  {
    Param([Parameter(Mandatory=$true)] $TrackingNumber)
    $invoke = (Invoke-Webrequest https://tools.usps.com/go/TrackConfirmAction?tLabels=$TrackingNumber).allelements | Where-Object  {$_.tagname -eq "tr" } 
    $information = $invoke | Select-Object OuterText -Unique -Skip 3
    $information | Format-Table @{Label=’Tracking Information’;Expression={$_.OuterText}}
}

Prevent users from creating Office 365 Groups

The script below will block users in a specified OWA Policy from creating Office 365 groups. The script uses Out-GridView to allow you to select which OWA Policy you want to assign this rule to.

#Office 365 Credentials
$username = "USERNAME"
$password = "PASSWORD"

try {
    #Attempts to connect to Office 365 and install Modules
    Import-Module MSOnline
    $pass = convertto-securestring -String "$password" -AsPlainText -Force 
    $credential = new-object -typename System.Management.Automation.PSCredential -argumentlist $username, $pass
    Connect-MsolService -Credential $credential -ErrorAction Stop
    $ExchangeSession = New-PSSession -ConfigurationName Microsoft.Exchange -ConnectionUri "https://outlook.office365.com/powershell-liveid/" -Credential $credential -Authentication "Basic" -AllowRedirection
    Import-PSSession $ExchangeSession >null
}
catch [Microsoft.Online.Administration.Automation.MicrosoftOnlineException] {
    #Logs error for incorrect password
    Write-Host "Please verify your username and password"
    Write-EventLog -LogName Application -Source "Office 365 Log" -EntryType Error -EventId 1 -Message "OFFICE 365 AUTOMATIC LICENSE ASSIGNMENT`n`nError Connecting to Office 365! Please verify your user name and password"
    exit
}

catch {
    #Log for any other error
    Write-Host "Error Connecting"
    Write-EventLog -LogName Application -Source "Office 365 Log" -EntryType Error -EventId 1 -Message "OFFICE 365 AUTOMATIC LICENSE ASSIGNMENT`n`nError Connecting to Office 365!"
    exit
}
$OWA = Get-OwaMailboxPolicy | Select Identity | Out-Gridview -Title "Select one or more OWA Policies" -PassThru | foreach { $_.Identity } 
if($OWA.count -eq 0) {
    Write-Host "Please rerun the script and select an OWA Policy"
}
else {
    if($OWA.count -gt 1) {
        foreach($MultiOWA in $OWA) {
            Set-OwaMailboxPolicy -Identity $MultiOWA -GroupCreationEnabled $False
        }
    }
    else {
        Set-OwaMailboxPolicy -Identity $OWA -GroupCreationEnabled $False
    }    
}

Automate your Meraki Client VPN Connection

Cisco does a great job with their documentation but unfortunately they didn’t do so well with explaining how to configure their VPN connection for medium to large scale companies. Their documentation only explains how to configure the connection manually, so I decided to use my Powershell skills to write up something really quick. Luckily for us, this task is extremely simple with Powershell.

The following script will automatically configure your Meraki VPN connection on Windows 10:

$ServerAddress = "VPN SERVER ADDRESS"
$ConnectionName = "VPN CONNECTION NAME"
$PresharedKey = "YOUR PRESHARED KEY"
Add-VpnConnection -Name "$ConnectionName" -ServerAddress "$ServerAddress" -TunnelType L2tp -AllUserConnection -L2tpPsk "$PresharedKey" -AuthenticationMethod Pap -Force

This script can be deployed using GPO, your existing system management system or even added to your images with MDT or SCCM.

I hope this helps someone out!