Deployment

“The universal unique identifier (UUID) type is not supported” MDT Fix

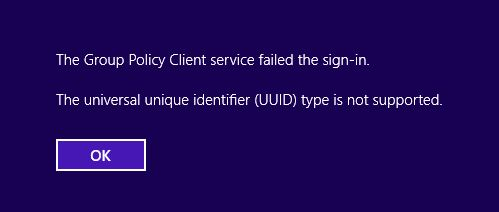
During our Windows 10 testing, we noticed that some users would randomly come across the universal unique identifier (UUID) type is not supported error when they logged onto their computer for the first time. In order to get around this error, Microsoft provided a work around that would work with SCCM. Click here for the article.

Unfortunately this does not work well with MDT because the administrator account does not have permission to add a value to the “HKLM\SYSTEM\CurrentControlSet\Services\gpsvc” registry key.
The following Powershell script will fix this by changing the owner of the key to the Administrators group and also providing full access to the Administrators group. This will be temporary since sysprep seems to revert the permissions after it has processed. Fortunately the value stays with the registry key!

Note: In order to have this fix work successfully with MDT, we will need to configure the script to run before the sysprep step in your capture task sequence.

$definition = @"
using System;
using System.Runtime.InteropServices;
 
namespace Win32Api
{
 
public class NtDll
{
[DllImport("ntdll.dll", EntryPoint="RtlAdjustPrivilege")]
public static extern int RtlAdjustPrivilege(ulong Privilege, bool Enable, bool CurrentThread, ref bool Enabled);
}
}
"@
 
Add-Type -TypeDefinition $definition -PassThru
 
$bEnabled = $false
$res = [Win32Api.NtDll]::RtlAdjustPrivilege(9, $true, $false, [ref]$bEnabled)

# Change Owner to the local Administrators group
$regKey = [Microsoft.Win32.Registry]::LocalMachine.OpenSubKey("SYSTEM\CurrentControlSet\Services\gpsvc",[Microsoft.Win32.RegistryKeyPermissionCheck]::ReadWriteSubTree,[System.Security.AccessControl.RegistryRights]::TakeOwnership)
$regACL = $regKey.GetAccessControl()
$regACL.SetOwner([System.Security.Principal.NTAccount]"Administrators")
$regKey.SetAccessControl($regACL)

# Change Permissions for the local Administrators group
$regKey = [Microsoft.Win32.Registry]::LocalMachine.OpenSubKey("SYSTEM\CurrentControlSet\Services\gpsvc",[Microsoft.Win32.RegistryKeyPermissionCheck]::ReadWriteSubTree,[System.Security.AccessControl.RegistryRights]::ChangePermissions)
$regACL = $regKey.GetAccessControl()
$regRule = New-Object System.Security.AccessControl.RegistryAccessRule ("Administrators","FullControl","ContainerInherit","None","Allow")
$regACL.SetAccessRule($regRule)
$regKey.SetAccessControl($regACL)

# Add registry key fix
cmd /c reg add "HKLM\SYSTEM\CurrentControlSet\Services\gpsvc" /v Type /t REG_DWORD /d 0x10 /f

Feel free to leave any questions in the comments!

Add a wireless profile to your MDT task sequence

First you will need to export the configuration for the wireless profile that you would like to add to your task sequence.
Note: You will need to connect to the wireless profile before you can export it.

:: ADD YOUR WIRELESS PROFILE NAME
SET WIFI-PROFILE="YOUR WIRELESS PROFILE"
:: EXPORT WIRELESS CONFIGURATION
NETSH WLAN EXPORT PROFILE "%WIFI-PROFILE%" FOLDER="%USERPROFILE%\Desktop" KEY=Clear

The export should have copied an XML file to your desktop. In order to keep this simple, go ahead and rename the XML file WirelessProfile.xml. Now, copy WirelessProfile.xml and place it inside of your Deployment Share.
For this example, I will be copying the XML file into a folder called Custom, inside of your scripts folder.

Now go ahead and open up your task sequence and add a “Run Command Line” task inside of the State Restore group.

You can name the task anything you would like but in this example I have named it “Add Wireless Profile”.

Last but not least, you will need to add the following in the Command Line field:

NETSH WLAN ADD PROFILE FILENAME="%SCRIPTROOT%\Custom\WirelessProfile.xml" USER=All

Update (5/2/2018):
There seems to be an issue with running XML files that are not stored locally. If the command to add the wireless does not work, try copying the XML file locally and then running the command.

Now you will have a pre-configured Wireless profile!

Registry Keys for Windows 10 Privacy Settings

The following registry keys in this post control the privacy settings in Windows 10 1607. These settings can be found in the GUI by going to SETTINGS\PRIVACY.
Read more

Pin shortcuts to a user in a specific Active Directory group.

The following Powershell script will pin the Chrome shortcut to the Windows 10 start menu for anyone inside of a specific Active Directory group. In order to pin to the start menu, you will need to verify if your shortcut can be pinned through the GUI. To check this, you can right click your shortcut and see if you have “Pin to Start” available in your context menu. If you do not see this, then you may want to try copying the shortcut to:
%PROGRAMDATA%\Microsoft\Windows\Start Menu\Programs

In order to configure the script, you will need to provide values for the following variables:
$Group = YOUR AD GROUP
$Shortcut = “THE SHORTCUT NAME WITH THE EXTENSION”
$Location = “THE SHORTCUT’S LOCATION”

# Variables that need to be set
$Group = "YOUR AD GROUP HERE"
$Shortcut = "Google Chrome.lnk"
$Location = "C:\ProgramData\Microsoft\Windows\Start Menu\Programs"


# Get User's Info
$objSearcher = New-Object System.DirectoryServices.DirectorySearcher
$objSearcher.SearchRoot = New-Object System.DirectoryServices.DirectoryEntry
$objSearcher.Filter = "(&(objectCategory=User)(SAMAccountName=$env:USERNAME))"
$objSearcher.SearchScope = "Subtree"
$obj = $objSearcher.FindOne()
$User = $obj.Properties["distinguishedname"]

# Get Group Info
$objSearcher.Filter = "(&(objectCategory=group)(SamAccountname=$Group))"
$objSearcher.SearchScope = "Subtree"
$obj = $objSearcher.FindOne()
[String[]]$Members = $obj.Properties["member"]

If ($Members -contains $User) { 
    $object= New-Object -ComObject shell.application
    $folder = $object.Namespace("$Location")
    $file= $folder.parsename("$Shortcut")
    $file.InvokeVerb('pintostartscreen')  
}

How to remove “Scan with Windows Defender” from the Context Menu

The following short batch script will automatically remove “Scan with Windows Defender” from the context menu for files, folders and drives in Windows 10.

:: Removes Windows Defender from the Context Menu for Files
REG DELETE HKEY_CLASSES_ROOT\*\shellex\ContextMenuHandlers\EPP /F
:: Removes Windows Defender from the Context Menu for Folders
REG DELETE HKEY_CLASSES_ROOT\Directory\shellex\ContextMenuHandlers\EPP /F
:: Removes Windows Defender from the Context Menu for Drives
REG DELETE HKEY_CLASSES_ROOT\Drive\shellex\ContextMenuHandlers\EPP /F

Automate your BIOS update in MDT

This universal script will automate your BIOS updates in MDT. In order for this script to work, you will need to configure your MDT deployment share with the following folder structure:
DeploymentShare$\Scripts\Custom\BIOS

Inside of the BIOS folder, you will need a folder for each model that you are supporting in your deployment. The folder names must match the model name that MDT queries with ZTIGather.
You can run wmic computersystem get model to get this value.

Folder Structure Example:
DeploymentShare$\Scripts\Custom\BIOS\10HY002AUS
DeploymentShare$\Scripts\Custom\BIOS\HP EliteBook 8560w

Inside of these folders, you will need to place all the files needed to install your BIOS update. You will also need to create custom files needed to silently install and determine the latest BIOS version.

1st File: BIOS.txt
In this txt file, you will place the BIOS version of the update. This is used to compare the BIOS version installed on the machine and the latest update version.
Example: FBKTCCAUS

2nd File: UpgradeBIOS.cmd
In this file you will add all the commands needed to silently install your BIOS update.
Example:

REM Setting Current Directory
cd "%~dp0"
WINUPTP.exe -s

Once you have the the folder structure completed, you will want to add a Reboot task to your Task Sequence. With this task, you will need to add an if statement with the following configuration:

Reboot Task Configuration

And now for the actual Powershell script!

# Load MDT Task Sequence Environment and Logs
$TSenv = New-Object -COMObject Microsoft.SMS.TSEnvironment
$logPath = $tsenv.Value("LogPath")
$logFile = "$logPath\BIOS_Update.log"
 
# Start the logging 
 
Write-Output "Logging to $logFile." > $logFile
 
# Collect data
Write-Output "Collecting Data" >> $logFile
$ScriptRoot = (Get-location).Path
$Model = $TSenv.Value("Model")
$CompBiosVersion = (Get-WmiObject WIN32_BIOS).SMBIOSBIOSVersion
$CurrentBiosVersion = Get-Content "$ScriptRoot\$Model\BIOS.txt"
$Installer = "UpgradeBIOS.cmd"

try {
    Test-Path $CurrentBiosVersion -ErrorAction Stop
}
catch {
    Write-Output "BIOS.txt does not exist!" >> $logFile
}

Write-Output "Copying $ScriptRoot\$Model to C:\Temp\$Model" >> $logFile
Copy-Item "$ScriptRoot\$Model" "C:\Temp\$Model" -Force -Recurse
 
# Checking for BIOS update
if($CompBiosVersion.replace(' ' , '') -eq $CurrentBiosVersion.replace(' ' , '')) {
    Write-Output "BIOS is up to date." >> $logFile
    Exit
}
else {
    Write-Output "Updating BIOS $CompBiosVersion to $CurrentBiosVersion." >> $logFile
    Start-Process "cmd.exe" "/c C:\Temp\$Model\$Installer" -Wait
    $tsenv.Value("NeedReboot") = "YES"
    Write-Output "Update has been completed successfully." >> $logFile
    Exit
}

How to enable used space encryption using Invoke-MbamClientDeployment.ps1

First and foremost, if you have not had a chance to read the latest Technet article on how to enable BitLocker by using MBAM, please do so here!

It is an excellent guide that explains how to configure MBAM and Bitlocker inside of MDT. Unfortunately the guide does not explain how to enable used space encryption when you are not pre-provisioning your drive. It’s actually pretty simple and can be done by just modifying the registry.

Now I’m assuming that you have Invoke-MbamClientDeployment.ps1 in your task sequence but if you have not set everything up, please read the Technet article that I referenced earlier.

In your task sequence, please navigate to the step that calls Invoke-MbamClientDeployment.ps1. If you followed the Technet guide, the task name should be “Configure BitLocker for MBAM”. Now go ahead and add a Run Command Line step before the “Configure BitLocker for MBAM” step. Let’s name this step “Enable Used Space Encryption”.

In the command line field, you will want to enter the following command:

reg.exe add HKLM\SOFTWARE\Policies\Microsoft\FVE /v OSEncryptionType /t REG_DWORD /d 2 /f

And.. That’s it!

How to configure your Windows 10 default file associations in MDT

You will first need to configure all your file associations on a test machine. Once this has been done, you will want to run the following command to export your file associations:

Dism.exe /Online /Export-DefaultAppAssociations:%USERPROFILE%\Documents\DefaultAppAssociations.xml

The XML file will be exported to your Documents folder

Now you will want to place the XML file that we just exported into your Scripts folder inside of your MDT Deployment Share.

Once that is done, launch MDT and open your deployment task sequence. Locate the PostInstall folder and add a command line task above the Inject Drivers task.


Set File Associations
Set File Associations - 2

Lets go ahead and name the task Set File Associations. In the command line field, insert the following command:

Dism.exe /Image:%OSDisk%\ /Import-DefaultAppAssociations:%SCRIPTROOT%\DefaultAppAssociations.xml

Now you’re all set!

Automatically join a machine to your domain

This short script will join a machine to your domain. This can be useful as a post start up script that will launch after a machine has been imaged.

$domain = "DOMAIN"
$password = "PASSWORD HERE" | ConvertTo-SecureString -asPlainText -Force
$username = "$domain\USERNAME HERE" 
$credential = New-Object System.Management.Automation.PSCredential($username,$password)
Add-Computer -DomainName $domain -Credential $credential

Feel free to comment if you have any questions!

One Column Start Layout

If you haven’t done it already, please read my post on how to deploy a customized start menu in your Windows 10 image.

Do you have a similar start layout that you would prefer to slim down and not have to do it manually for each profile?

Well you can do this by configuring LayoutModification.xml to display only one main column and all you have to do is edit the following line:

<LayoutOptions StartTileGroupCellWidth="6" />

And add StartTileGroupsColumnCount=”1″

<LayoutOptions StartTileGroupCellWidth="6" StartTileGroupsColumnCount="1" />