Deployment

Customize a Windows 10 Start Layout

To customize the Start Menu in your images, you will need to export a ‘reference’ Start Menu using the Export-StartLayout PowerShell cmdlet.

First you will need to setup the Start Menu exactly the way you want it, and then export the layout.

Export-StartLayout –path C:\LayoutModification.xml

Now, you can import the custom XML into the Default profile before sysprep.
Note: Only new user profiles will be able to see the new layout

Import-StartLayout -LayoutPath LayoutModification.xml -MountPath $env:SystemDrive\

If for some reason you have problems with the import, you can just copy the custom XML file into the Default profile.
Note: Only new user profiles will be able to see the new layout

copy /y LayoutModification.xml “C:\Users\Default\AppData\Local\Microsoft\Windows\Shell”

How to programmatically pin icons in Windows 10

UPDATE 01/01/2017:
Microsoft finally released an approved method to pin icons to the taskbar. I would highly suggest using this method since Syspin is a 3rd party tool that is not approved.
You can find out more info here:
https://technet.microsoft.com/en-us/itpro/windows/manage/configure-windows-10-taskbar

In previous versions of Windows, you used to be able to use the verb Pintotaskbar to programmatically pin programs to your taskbar.

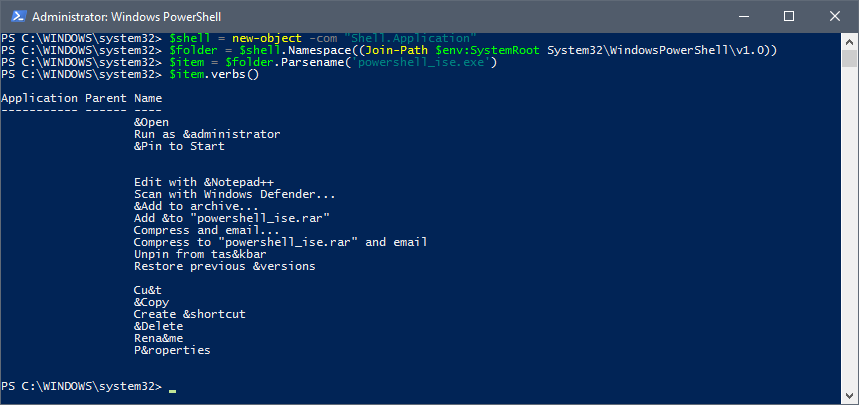
Example on how to pin Powershell ISE to the taskbar in Windows 8.1:

    $shell = new-object -com "Shell.Application"  
    $folder = $shell.Namespace((Join-Path $env:SystemRoot System32\WindowsPowerShell\v1.0))
    $item = $folder.Parsename('powershell_ise.exe')
    $item.invokeverb('taskbarpin');

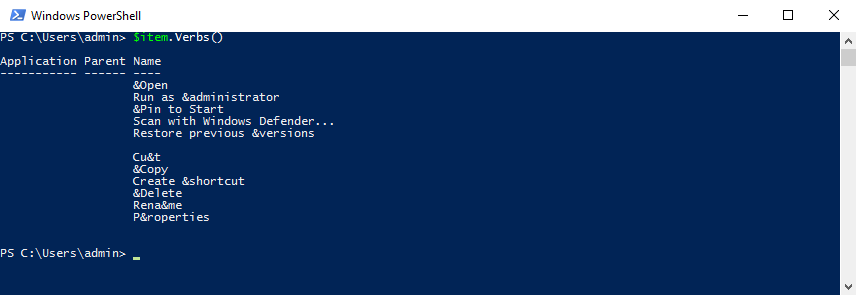
This is no longer the case with Windows 10 and retrieving the verbs with $item.Verbs() from the script above, returns all verbs except for “Pin to taskbar”.  If you right click the file via the GUI, you will see that this verb does indeed exist.

Powershell verb

After a while of researching, I found a great third party tool that can easily pin icons to your taskbar in Windows 10.

The tool is called SysPin and you can download it from the following URL:
http://www.technosys.net/products/utils/pintotaskbar

Below are some instructions on how to use the tool:

Usage : syspin ["file"] c:#### or syspin ["file"] c:"commandstring"
        c:5386  : Pin to Taskbar
        c:5387  : Unpin from Taskbar
        c:51201 : Pin to Start
        c:51394 : Unpin to Start

Samples :
  syspin "%PROGRAMFILES%\Internet Explorer\iexplore.exe" c:5386
  syspin "C:\Windows\notepad.exe" c:"Pin to Taskbar"
  syspin "%WINDIR%\System32\calc.exe" c:"Pin to Start"
  syspin "C:\Windows\System32\calc.exe" c:51201

Unfortunately I haven’t found a way to unpin Edge and the Microsoft App store with this utility but I have been successful using the following tutorial to unpin everything before sysprepping the machine.
http://ccmexec.com/2015/12/removing-the-edge-icon-from-the-taskbar-during-osd/

Good luck and I hope this helps someone!

Windows 10 Upgrade

Depending on your environment, you may or may not need to have prerequisites that need to be done before starting an upgrade. These tasks may include, disabling your antivirus or uninstalling any software that may not be compatible with Windows 10. Once you have automated these tasks you can start the Windows 10 upgrade process by using the following command:

"setup.exe" /auto upgrade /quiet /copylogs %SystemDrive%\Temp\Deployment_Log 

This is a very basic way to silently upgrade your computers to Windows 10.  You can add further customization such as adding a post script that will launch after the upgrade is done.  To do this you can add the /PostOOBE<location>\[setupcomplete.cmd] switch to the command above.

Once you have your scripts ready, you can deploy them with the software that you use to push out your packages (Kaseya, LANDesk, SCCM, etc).

Read more

Windows 10 Sysprep Issue

Recently I noticed that when you sysprep Windows 10 and use CopyProfile=TRUE in your unattend.xml, it will copy over the last used folders and recent files of the built-in admin.

Quick Access

In order to remove the Quick Access history, you will need to place a batch file inside the built-in admin’s %appdata%\Microsoft\Windows\Start Menu\Programs\Startup folder in Audit Mode before running Sysprep.

Read more

Page 4 of 4
« Newer Posts