
This universal script will automate your BIOS updates in MDT. In order for this script to work, you will need to configure your MDT deployment share with the following folder structure:
DeploymentShare$\Scripts\Custom\BIOS
Inside of the BIOS folder, you will need a folder for each model that you are supporting in your deployment. The folder names must match the model name that MDT queries with ZTIGather.
You can run wmic computersystem get model to get this value.
Folder Structure Example:
DeploymentShare$\Scripts\Custom\BIOS\10HY002AUS
DeploymentShare$\Scripts\Custom\BIOS\HP EliteBook 8560w
Inside of these folders, you will need to place all the files needed to install your BIOS update. You will also need to create custom files needed to silently install and determine the latest BIOS version.
1st File: BIOS.txt
In this txt file, you will place the BIOS version of the update. This is used to compare the BIOS version installed on the machine and the latest update version.
Example: FBKTCCAUS
2nd File: UpgradeBIOS.cmd
In this file you will add all the commands needed to silently install your BIOS update.
Example:
REM Setting Current Directory
cd "%~dp0"
WINUPTP.exe -s
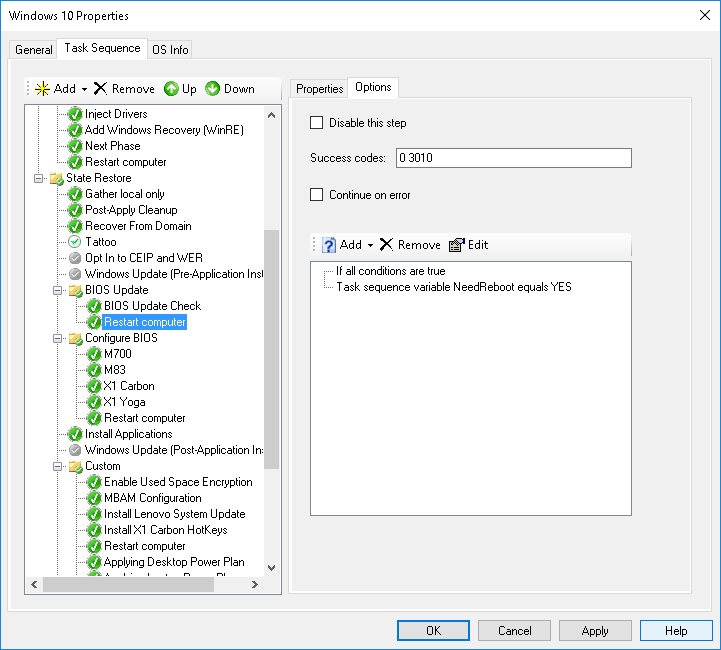
Once you have the the folder structure completed, you will want to add a Reboot task to your Task Sequence. With this task, you will need to add an if statement with the following configuration:
And now for the actual Powershell script!
# Load MDT Task Sequence Environment and Logs
$TSenv = New-Object -COMObject Microsoft.SMS.TSEnvironment
$logPath = $tsenv.Value("LogPath")
$logFile = "$logPath\BIOS_Update.log"

# Start the logging

Write-Output "Logging to $logFile." > $logFile

# Collect data
Write-Output "Collecting Data" >> $logFile
$ScriptRoot = (Get-location).Path
$Model = $TSenv.Value("Model")
$CompBiosVersion = (Get-WmiObject WIN32_BIOS).SMBIOSBIOSVersion
$CurrentBiosVersion = Get-Content "$ScriptRoot\$Model\BIOS.txt"
$Installer = "UpgradeBIOS.cmd"

try {
    Test-Path $CurrentBiosVersion -ErrorAction Stop
}
catch {
    Write-Output "BIOS.txt does not exist!" >> $logFile
}

Write-Output "Copying $ScriptRoot\$Model to C:\Temp\$Model" >> $logFile
Copy-Item "$ScriptRoot\$Model" "C:\Temp\$Model" -Force -Recurse

# Checking for BIOS update
if($CompBiosVersion.replace(' ' , '') -eq $CurrentBiosVersion.replace(' ' , '')) {
    Write-Output "BIOS is up to date." >> $logFile
    Exit
}
else {
    Write-Output "Updating BIOS $CompBiosVersion to $CurrentBiosVersion." >> $logFile
    Start-Process "cmd.exe" "/c C:\Temp\$Model\$Installer" -Wait
    $tsenv.Value("NeedReboot") = "YES"
    Write-Output "Update has been completed successfully." >> $logFile
    Exit
}
JD
So what exactly are the “commands needed to silently install your BIOS update.” ???
Jose Espitia
JD, the commands to silently install your BIOS update can differ between manufacturers and even computer models. For example the Optiplex 3050 BIOS update can be silently installed by running the following command:
“OptiPlex_3050_1.5.4.exe” /s
However the the Lenovo ThinkCentre M700’s silent command is:
wflash2.exe imageFW.rom /rsmb /quiet
This information is usually documented in the BIOS notes. If you need any assistance, let me know and I would be more than happy to help out.
Rich
What is the “THEN” statement? IF the bios is not equal to the current one, install the upgrade and reboot. However, if the version IS the current, I get slammed with a popup saying the bios is already current and I have to click OK.
So there’s no escape in the logic for the situation where the version IS equal to the version in the text file. How do you go about that?
Kelly
This solution failed during MDT deployment/ I added in the same place as your TS. DELL says use flash64.exe /s
In your TS how do you execute the PS.1 commandline or powershell script line?
Jose Espitia
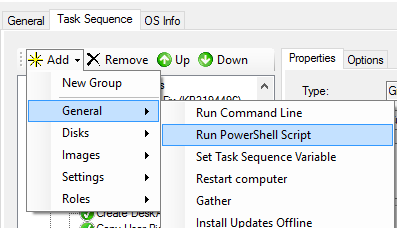
What error are you getting when running the script? I normally add my Powershell scripts by selecting Add\General\Run PowerShell Script in the TS editor. (see screenshot below)
Greg Deichler
I was able to get this mostly working. It is logging and recognizing version differences in the bios, but I cannot get the UpgradeBIOS.cmd to execute. All the logs are acting as though it ran successfully.
Can you include a picture of your ‘BIOS Update Check’ task step please?
Jose Espitia
Can you try running the following script manually? (Keep in mind that in order for this to work, the folder structure must stay the same)
$ScriptRoot = (Get-location).Path$Model = (Get-WmiObject Win32_Computersystem).Model
$CompBiosVersion = (Get-WmiObject WIN32_BIOS).SMBIOSBIOSVersion
$CurrentBiosVersion = Get-Content "$ScriptRoot\$Model\BIOS.txt"
$Installer = "UpgradeBIOS.cmd"
Try {
Test-Path $CurrentBiosVersion -ErrorAction Stop
}
Catch {
Write-Host "BIOS.txt does not exist"
Return
}
# Checking for BIOS update
If($CompBiosVersion.replace(' ' , '') -eq $CurrentBiosVersion.replace(' ' , '')) {
Write-Host "BIOS does not need to be updated"
}
Else {
Write-Host "Updating BIOS $CompBiosVersion to $CurrentBiosVersion."
Start-Process "cmd.exe" "/c $ScriptRoot\$Model\$Installer" -Wait
Write-Host "Update has been completed successfully."
}
Nate
I modified the script, so I could organize future scripts… I changed your PS script from:
CurrentBiosVersion = Get-Content “$ScriptRoot\$Model\BIOS.txt”
Start-Process “cmd.exe” “/c $ScriptRoot\$Model\$Installer” -Wait
to
Start-Process “cmd.exe” “/c $ScriptRoot\bios\$Model\$Installer” -Wait
Start-Process “cmd.exe” “/c $ScriptRoot\bios\$Model\$Installer” -Wait
note the sub-directory called Bios
When I check the log file I see:
Logging to C:\MININT\SMSOSD\OSDLOGS\BIOS_Update.log.
Collecting Data
Updating BIOS R0SET23W (1.07 ) to R0SET28W.
Update has been completed successfully.
However, the flash never ran.
The command syntax for the flash file
REM Setting Current Directory
cd “%~dp0”
WINUPTP.exe -s
What changes with the command %~dp0 to get it to locate the installer.
Nate
To add to more detail, the TS is called from the following location %scriptroot%\custom\bioscheck.ps1.
Nate
I also completed testing using the directory unchanged, and the result is the same.
Greg Deichler
I am going to my “Z:” drive after a deployment, opening a powershell window in Z:\Scripts and here is what I am getting:
PS Z:\Scripts> .\TestBIOSscript.ps1
False
Updating BIOS N1QET55W (1.30 ) to N1QET72W (1.47 ).
Update has been completed successfully.
The BIOS is not updated. When I reboot, or shutdown nothing happens. No BIOS update.
Im stumped.
Greg Deichler
I also found this in the log file in the T470 bios folder on the deployment share. Thats me manually running the script earlier.
[2018/3/22 13:37:29] version 30.22
OS = Windows 10 64bit
Driver Loading….Driver Loading failed !
[2018/3/22 13:59:55] version 30.22
OS = Windows 10 64bit
Driver Loading….Driver Loading failed !
Jose Espitia
Sounds like the script in UpgradeBIOS.cmd is not working. This script will always vary between devices so you will need to look through the BIOS documentation and find the silent switches for the update.
Gilles
Hello Jose,
Many thanks for your work ! We tried to add your PS script to our MDT 2013 TS (PS Path : %SCRIPTROOT%\Custom\BIOS\DellBIOSUpdate.PS1) but get an error at the end of the deployment (Cannot find path ‘Microsoft.PowerShell.Core\FileSystem::Scripts\Custom\BIOS\Optiplex 990\BIOS.txt’ because it does not exist)
Do you have any idea why ? Thanks in advance for your precious help
Jose Espitia
Is the file in the correct location?
Greg Deichler
Hello Gilles. I was getting that same error. I had to make some script modifications to get it to work. I can send you it if youd like. message me on twitter: @gregdeichler
Jose Espitia
Greg, Can you post the script in the comments too?
Greg Deichler
My issue was the bios updates would not run from the deployment share network location. I added a line to the script to copy the bios update to the internal hard drive first and then it ran fine.
Thanks for the help.
Jeff
Greg what is your complete script to copy to the local drive and execute…
From the ps1 i’ve launch a cmd to map a drive and start the cmd (that have the command to start the bios update process with the exe), but I received a “bioslauncher.exe is not recognized as an internal or external command”
Nathan
I followed the steps, and the logs seem to indicate the flash should run, but after that TS and reboot I am not seeing the bios update being applied. I tried this in two formats, one as you have provided, and the other modified the PS script to allow me to organize the run directory. So instead of being in scripts\custom it would work in scripts\custom\bios
allowing me to use a cleaner folder structure. In either case the bios fails to flash.
When I check the log I see the following:
Logging to C:\MININT\SMSOSD\OSDLOGS\BIOS_Update.log.
Collecting Data
Updating BIOS N10ET44W (1.23 ) to N10ET52W.
Update has been completed successfully.
Flashing Lenovo laptops
Henry
I can see the same BIOS_Update.log on test deployments. It says it is updating from 1.8.2 to 1.10.4 (Dell Latitude 5480). I have the command working normally as a task sequence, but I am tired of having to update every task sequence when there is a new BIOS to deploy. Which is why I am trying this.
My Upgrade_BIOS.cmd is:
REM Setting Current Directory
cd “%~dp0”
Latitude_5X80_Precision_3520_1.10.4.exe /s /f
*I also am trying to upgrade after the OS is deployed in the State Restore group instead of in WinPE. That is where we have always done it and it works without issue.
Nathan
When the TS finishes I see this in the log, but the bios does not update.
Logging to C:\MININT\SMSOSD\OSDLOGS\BIOS_Update.log.
Collecting Data
Updating BIOS N10ET44W (1.23 ) to N10ET52W.
Update has been completed successfully.
Jose Espitia
Did you reboot the computer for the update to complete?
Nathan
Yes, the scripts flag settings tells it to reboot. It reboots, and never runs the flash. I also tried the following batch file to see if this would resolve the problem. It copies all of the files to the local pc, and then runs the command. I placed the pause comments in there, so I can see it run… the flash still does not run with this as the upgrade command.
REM Setting Current Directory
pushd “%~dp0”
pause
mkdir c:\swtools\flash
xcopy /e *.* c:\swtools\flash
popd
cd /d c:\swtools\flash
pause
WINUPTP.exe -s
Jose Espitia
Nathan, does the BIOS flash if you run WINUPTP.exe -s manually? Also adding a pause will force some type of manual intervention. I would suggest adding pinging to create an automated pause (ex: ping -n 3 127.0.0.1>nul )
Matthijs
Try to change /c to /k
Start-Process “cmd.exe” “/k $ScriptRoot\$Model\$Installer” -Wait
Probably after that you see the next warning in a cmd box.
CMD.EXE was started with the above path as the current directory.
UNC paths are not supported. Defaulting to Windows directory.
I needed to add Set-Location -Path C:\ before Start-process.
Set-Location -Path C:\
Start-Process “cmd.exe” “/k \\hostname\deploymentshare$\scripts\BIOS\$Model\$Installer” -Wait
$tsenv.Value(“NeedReboot”) = “YES”
Write-Output “Update has been completed successfully.” >> $logFile
# write logging from update process to $logfile
Write-Output (Get-Content “C:\swtools\flash\Winuptp.log” | Out-String -Width 1000) >> $logFile
Jack
Two issues i encountered – Lenovo only runs from the local drive NOT deployment share, i needed to use the winuptp64.exe too and works great!
Jose Espitia
Good to know Jack! That might actually be the issue that some people are having. Personally my job was using MDT Offline Media (USB ISO) so we never ran into this issue.
AA
Optiplex 3070
first attempt at automating this.
I know my run cmd works, I can run the cmd manually:
“BIOSUpdate.exe” /s /r /status /l=”C:\BIOSUpdate_log.txt”
I am really struggling to get your scripts to work. I don’t seem to be producing any logs from the PS1 script so I can’t actually tell if it is running. I dont know if its the ps1 at fault or the cmd at fault. Ive also alterned my cmd to mkdir and copy the .exe to the new dir before running but the dir never gets created. Ive tried switching the /c to /k and changing the Start-Process to the entire directory. Ive also added “Set-Location – Path C:\”.
the curent error I am getting makes it look like it cannot get the full model name. how do I test the output of your $Model var: $Model = $TSenv.Value(“Model”)
error:
‘servername\deploymentshare2$\Scripts\Custom\BIOS\Opotiplex’ is not recognized as an internal command, operable program or batch file.
it’s not using the full model name because it has a space? I have quotes “path” around my path just like in this script.
I really need this working.
can anyone post a working version of the ps1 script please? or how can I edit it for debugging so I can see how far it is getting?
Stefan
We work with HP clients.
I have adapted my MDT according to these instructions.
My clients make the update of the bios perfect.
However the update is not done in Windows but directly in the bios.
After restarting with the updated bios my MDT wants to continue with the installation, but only this message appears: “An existing in-progress deployment was found but is not in an expected state. Would you like to ignore this in-progress deployment and start a new one?
How can I prevent this? Respectively, how do I get the MDT to continue with the installation?
Any advice would be appreciated.